In this tutorial you will find out the easiest way to create your own custom User Interface and custom window chrome…
Requirements
There are a few requirements you need before starting this tutorial, they are:
- Visual Studio / Visual Basic 2008 Express
- Microsoft Expression Blend 3 (60 day trial)
- A very basic knowledge of Expression Blend/XAML/Visual Basic
Once you have them, you are ready to begin.
Just beginning…
Once you have Expression Blend downloaded and installed you will want to open it up and create a new project in it, make sure to select the coding language as Visual Basic. Then you should see this screen below.
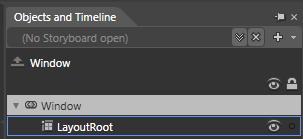
Now you need to tell Expression Blend that you are making your own stylish window. What you need to do is go into the Objects and Timeline panel, and click on ‘Window’ as shown below.

Objects and Timeline panel with Window selected.
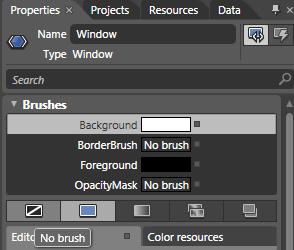
And then over in the Properties panel, you’ll need to set “Allows Transparency” to true, or tick the checkbox. Once you do that you should notice that the window chrome has gone, and you are left with a white background. To get rid of that, select the Window again and in the Properties panel, select the Background Colour and set it to ‘No Brush’. You can find no brush next to the Solid Colour part.

Demonstrating the No Brush button.
Creating the custom window…
Now you’re wondering how to create your custom window, right? Well it’s actually extremely simple. For example I am going to create a window with transparency, a title, a minimize button and a close button and you will be able to move it around.
Okay, start by selecting the Rectangle Tool and drag a rectangle from the top left corner to the bottom right. It should look like this.
Look familiar? Now why did we do that, you ask. Well it’s simple. By doing that we have a lot more functionality and flexibility. Now, with that newly created rectangle selected, let’s make it into a transparent gradient. Select the Gradient Brush, leave the colours as Black and White for now, and then set the Alpha values for both of them to about 35%.
Now we need to create another rectangle. Make it smaller than your gradient one and make sure it is filled with white. This will be your content area, if you run it (Hit F5) you should now have something like this.
You now have your own custom window, but you can not close it, move it around etc. We will now move on to that. To close your window, click in the window, hold down Alt and press F4.
Adding In Functions
To make your form to be drag-able, click on the semi-transparent rectangle, and in the Properties window click on the Events button next to the Properties button in the top right, as shown below.

Location of Events button.
Now, once your in the events panel, scroll down and find “MouseLeftButtonDown”. In the text box next to it, add in ‘DragForm’. As soon as you hit Enter you will go into a code editor and your sub will be created for you. In the newly created sub, add in:
DragMove()
And that’s it. Once you hit F5 again, you will notice that if you click and hold the left mouse button down on the semi-transparent area you will move your form around. Now let’s get onto adding the close, minimize and title functions.
To add a title, double click on the icon that looks like a T in a square, edit the text to what you want it to say and move it into position, it should look like this.

Window title.
Now adding your close button, add some more text by double clicking on the text icon, change the text to ‘X’ and in the properties panel, change the font to bold.

Move it into position and when the X is selected, go back into the Events panel, find “LeftMouseButtonDown” again and add CloseForm into the textbox. Once you get a new sub created for you, add in this:
Me.Close()
Finished
Once you hit F5, you will be finished. You will be able to close the button with the X and you will be able to move it around.
It should look something like this below.
I hope you enjoyed this tutorial.
Thanks for reading.


Lol, if only they would make Expression blend free…why on earth don’t they make it easier to create custom chrome???
It is possible to create the same effect just using Visual Studio/Express. But it is a lot harder, if you take the XAML from Expression Blend and paste it into the XAML section of Window.xaml it will work perfectly, it’s just a lot harder if you do not have expression blend.
So waitwaitwaitwaitwait a sec, you don’t NEED expression blend? Cool, Ill just make a program that codes the xaml for me.
There’s also multiple programs that already do it, but you’ll probably have to code it by hand, doing a quick Google search and I found this, looks pretty good. Maybe I’ll make a post on editors and how good they are etc.